ヘプタゴンの技術ブログ

サーバ/ネットワーク/linux/AWSとか青森を拠点でやってます

PHP Warning: Mysql_connect(): Mysqlnd Cannot Connect to MySQL 4.1+ Using the Old Insecure Authentication.

php5.4をインストールしてデータベース接続したらエラー出ました。

# /usr/local/lib/php-5.4/bin/php54 -r 'mysql_connect("localhost", "root", "password");';
PHP Warning: mysql_connect(): mysqlnd cannot connect to MySQL 4.1+ using the old insecure authentication.
Please use an administration tool to reset your password with the command SET PASSWORD = PASSWORD('your_existing_password').
This will store a new, and more secure, hash value in mysql.user.
If this user is used in other scripts executed by PHP 5.2 or earlier you might need to remove the old-passwords flag from your my.cnf file in Command line code on line 1

とりあえずold_passwords=0を設定してパスワードを再設定すればいいらしい。
どういうことかというとこちらのサイトさまの説明が詳しいです。

http://serversmanvps.xn–ockc3f5a.com/2013/06/10/old_passwords%E3%81%AE%E7%BD%A0/

要は、
・old_passwords=0の場合はPASSWORD関数が生成するハッシュが41桁になる
・old_passwords=1の場合はPASSWORD関数が生成するハッシュが16桁になる
ということらしい。

とりあえず今回は一時的に@@session.old_passwordsを0にしてパスワード再設定して対応。
その後無事接続できました。

mysql> SELECT @@session.old_passwords, @@global.old_passwords;
+-------------------------+------------------------+
| @@session.old_passwords | @@global.old_passwords |
+-------------------------+------------------------+
|                       1 |                      1 |
+-------------------------+------------------------+

mysql> SET @@session.old_passwords = 0;

mysql> SELECT @@session.old_passwords, @@global.old_passwords;
+-------------------------+------------------------+
| @@session.old_passwords | @@global.old_passwords |
+-------------------------+------------------------+
|                       0 |                      1 |
+-------------------------+------------------------+

mysql> set password for 'user'@'localhost' = PASSWORD('password');
mysql> flush privileges;
dnsmasqで簡単DNSキャッシュサーバ

dnsmasqでDNSキャッシュサーバを構築します。
DNSといえばBINDですが、めんどくさいので嫌いです。
nsd+dnsmasqが素晴らしいです。
dnsmasqはdnsキャッシュサーバの機能だけでなくdhcpサーバやtftpサーバの機能まであります。素晴らしい!(使わないけど。
Route53はもっと素晴らしいですけどね!!

  • 環境
$ cat /etc/system-release
 Amazon Linux AMI release 2013.09

$ uname -a
 Linux ip-172-31-0-248 3.4.73-64.112.amzn1.x86_64 #1 SMP Tue Dec 10 01:50:05 UTC 2013 x86_64 x86_64 x86_64 GNU/Linux

$ dnsmasq -v
Dnsmasq version 2.48 Copyright (C) 2000-2009 Simon Kelley


  • Install
$ sudo yum install dnsmasq


  • 設定 & 起動

今回はDNSキャッシュサーバとしてのみ使用します。
ローカルからの接続のみ許可します。
そのうえで/etc/resolv.confに追加してあげます。

$ sudo vim /etc/dnsmasq.conf
-----------------------------------------
listen-address=127.0.0.1
bind-interfaces
-----------------------------------------

$ sudo vim /etc/resolv.conf
-----------------------------------------
nameserver 127.0.0.1
nameserver 172.31.0.2
-----------------------------------------

$ sudo service dnsmasq start
$ sudo netstat -nlp|grep :53
tcp 0 0 127.0.0.1:53 0.0.0.0:* LISTEN 17586/dnsmasq
udp 0 0 127.0.0.1:53 0.0.0.0:* 17586/dnsmasq


  • 確認

適当にdigします。
1回目は外部サーバに聞きにいくので遅いですが、2回目以降はキャッシュから返してくれるので速いです!
dnsラウンドロビンの機能も持っているので複数のレコードを持つ場合なども順番に返してくれるので安心です。

$ dig google.com
; <<>> DiG 9.8.2rc1-RedHat-9.8.2-0.17.rc1.30.amzn1 <<>> google.com
;; global options: +cmd
;; Got answer:
;; ->>HEADER<;; flags: qr rd ra; QUERY: 1, ANSWER: 11, AUTHORITY: 0, ADDITIONAL: 0

;; QUESTION SECTION:
;google.com. IN A

;; ANSWER SECTION:
google.com. 300 IN A 173.194.126.238
google.com. 300 IN A 173.194.126.224
google.com. 300 IN A 173.194.126.225
google.com. 300 IN A 173.194.126.226
google.com. 300 IN A 173.194.126.227
google.com. 300 IN A 173.194.126.228
google.com. 300 IN A 173.194.126.229
google.com. 300 IN A 173.194.126.230
google.com. 300 IN A 173.194.126.231
google.com. 300 IN A 173.194.126.232
google.com. 300 IN A 173.194.126.233

;; Query time: 44 msec
;; SERVER: 127.0.0.1#53(127.0.0.1)
;; WHEN: Sun Feb 16 14:28:39 2014
;; MSG SIZE rcvd: 204

$ dig google.com
; <<>> DiG 9.8.2rc1-RedHat-9.8.2-0.17.rc1.30.amzn1 <<>> google.com
;; global options: +cmd
;; Got answer:
;; ->>HEADER<;; flags: qr rd ra; QUERY: 1, ANSWER: 11, AUTHORITY: 0, ADDITIONAL: 0

;; QUESTION SECTION:
;google.com. IN A

;; ANSWER SECTION:
google.com. 297 IN A 173.194.126.233
google.com. 297 IN A 173.194.126.232
google.com. 297 IN A 173.194.126.231
google.com. 297 IN A 173.194.126.230
google.com. 297 IN A 173.194.126.229
google.com. 297 IN A 173.194.126.228
google.com. 297 IN A 173.194.126.227
google.com. 297 IN A 173.194.126.226
google.com. 297 IN A 173.194.126.225
google.com. 297 IN A 173.194.126.224
google.com. 297 IN A 173.194.126.238

;; Query time: 1 msec
;; SERVER: 127.0.0.1#53(127.0.0.1)
;; WHEN: Sun Feb 16 14:28:42 2014
;; MSG SIZE rcvd: 204

$ dig google.com
; <<>> DiG 9.8.2rc1-RedHat-9.8.2-0.17.rc1.30.amzn1 <<>> google.com
;; global options: +cmd
;; Got answer:
;; ->>HEADER<;; flags: qr rd ra; QUERY: 1, ANSWER: 11, AUTHORITY: 0, ADDITIONAL: 0

;; QUESTION SECTION:
;google.com. IN A

;; ANSWER SECTION:
google.com.     295 IN  A   173.194.126.224
google.com.     295 IN  A   173.194.126.238
google.com.     295 IN  A   173.194.126.233
google.com.     295 IN  A   173.194.126.232
google.com.     295 IN  A   173.194.126.231
google.com.     295 IN  A   173.194.126.230
google.com.     295 IN  A   173.194.126.229
google.com.     295 IN  A   173.194.126.228
google.com.     295 IN  A   173.194.126.227
google.com.     295 IN  A   173.194.126.226
google.com.     295 IN  A   173.194.126.225

;; Query time: 1 msec
;; SERVER: 127.0.0.1#53(127.0.0.1)
;; WHEN: Sun Feb 16 14:28:43 2014
;; MSG SIZE rcvd: 204


負荷テストツールsiegeのインストール・設定

最近WEBの負荷テストのツールでsiegeをよく使っています。
siegeとは、包囲攻撃という意味の単語で、「シィージ」と発音するみたいです。

アクセス先を複数のURLからランダムで抽出する
インターネットモードがなかなか便利です。

○インストール
wget http://www.joedog.org/pub/siege/siege-3.0.5.tar.gz tar xvf siege-3.0.5.tar.gz
cd siege-3.0.5
./configure
make
make install

○負荷をかけるURLを設定
vi /usr/local/etc/urls.txt
———

http://hoge.huge/index.html

http://hoge.huge/1.html

http://hoge.huge/2.html

http://hoge.huge/3.html

———
http://hoge.huge/script POST key1=value1&key2=value2
などと書くとPOSTも可能です。

○実行
siege -c 300 -t 10S -b -i -f /usr/local/etc/urls.txt
=>urls.txtからランダムにURLを抽出して、10秒間300同時接続でアクセスをする

○実行結果
Transactions: 1442 hits
Availability: 100.00 %
Elapsed time: 1.08 secs
Data transferred: 0.01 MB
Response time: 0.08 secs
Transaction rate: 1335.19 trans/sec
Throughput: 0.01 MB/sec
Concurrency: 103.77
Successful transactions: 1442
Failed transactions: 0
Longest transaction: 0.52
Shortest transaction: 0.00

オプションや実行結果の詳細は、以下のページが詳しいです。

http://nori3tsu.hatenablog.com/entry/2013/11/02/125000

Mysqldump: Couldn’t Execute ‘show Create Table `cond_instances`’: Unknown Table Engine ‘PERFORMANCE_SCHEMA’ (1286)

mysqldump時にエラー出ました。。

備忘録です。


環境はこちら。

[root@localhost ~]# cat /etc/redhat-release
CentOS release 5.6 (Final)

[root@localhost ~]# uname -a
Linux localhost 2.6.18-238.5.1.el5 #1 SMP Fri Apr 1 18:41:58 EDT 2011 x86_64 x86_64 x86_64 GNU/Linux

[root@localhost ~]# mysql -V
mysql Ver 14.14 Distrib 5.1.52, for redhat-linux-gnu (x86_64) using readline 5.1


mysqldump時に起こったエラーがこちら。

[root@localhost ~]# mysqldump -u root -p --all-databases --lock-all-tables > /tmp/mysqldump.sql
Enter password:
mysqldump: Couldn't execute 'show create table `cond_instances`': Unknown table engine 'PERFORMANCE_SCHEMA' (1286)


んで解決方法調べたらとりあえずスキップしろとのことだったので下記で突破。

[root@localhost ~]# mysqldump -u root -p --all-databases --lock-all-tables \
--ignore-table=performance_schema.cond_instances \
--ignore-table=performance_schema.events_waits_current \
--ignore-table=performance_schema.cond_instances \
--ignore-table=performance_schema.events_waits_history \
--ignore-table=performance_schema.events_waits_history_long \
--ignore-table=performance_schema.events_waits_summary_by_instance\
--ignore-table=performance_schema.events_waits_summary_by_thread_by_event_name \
--ignore-table=performance_schema.events_waits_summary_global_by_event_name \
--ignore-table=performance_schema.file_instances \
--ignore-table=performance_schema.file_summary_by_event_name \
--ignore-table=performance_schema.file_summary_by_instance \
--ignore-table=performance_schema.mutex_instances \
--ignore-table=performance_schema.performance_timers \
--ignore-table=performance_schema.rwlock_instances \
--ignore-table=performance_schema.setup_consumers \
--ignore-table=performance_schema.setup_instruments \
--ignore-table=performance_schema.setup_timers \
--ignore-table=performance_schema.threads > /tmp/mysqldump.sql

とりあえず解決!


でもインポートのときにもエラーがありまして、

文字コードがsjisのテーブルをそのままインポートしようとしたら下記エラーが。。

[root@localhost ~]# mysql -u root -p < /tmp/mysqldump.sql
Enter password:
ERROR at line 1157: Unknown command '\�'.


“/etc/my.cnf”に書いたけどダメだったので、

–default-character-set オプションを渡して解決。

[root@localhost ~]# mysql -u root -p --default-character-set=sjis < /tmp/mysqldump.sql


EC2の利用状況の詳細レポート設定

先日、EC2の利用状況のレポート昨日がリリースされ、
インスタンスの種類毎やタグ毎に費用や稼働時間などが、
分かりやすく把握できるようになりました。

http://aws.typepad.com/aws_japan/2014/01/amazon-ec2-instance-usage-and-reserved-instance-utilization-reports.html

デフォルトではレポートは設定されておらず、
有効にするには設定が必要なので、その設定方法をまとめました。

1、マネジメントコンソールにログインして、S3へ。

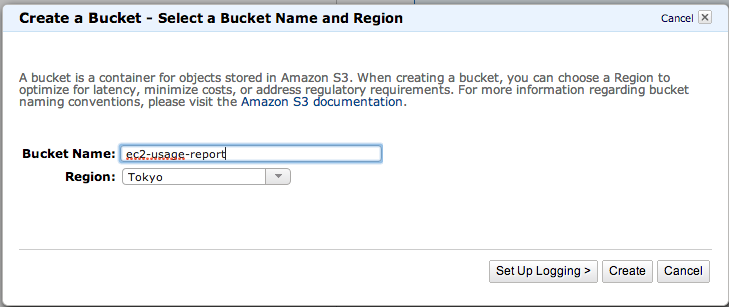
2、請求データを保存するバケットを新規作成。
billingとかusage-dataとかは予約されている模様で使えないようです。
(3、4回チェックで引っかかりました。。。)
パーミッションは後から設定するので、すぐにcreateで大丈夫です。

s3バケット作成

3、Billing console=>Preferencesに移動し、
「Note: You must apply appropriate permissions to your S3 bucket sample policy」
のsample policyをクリックします。
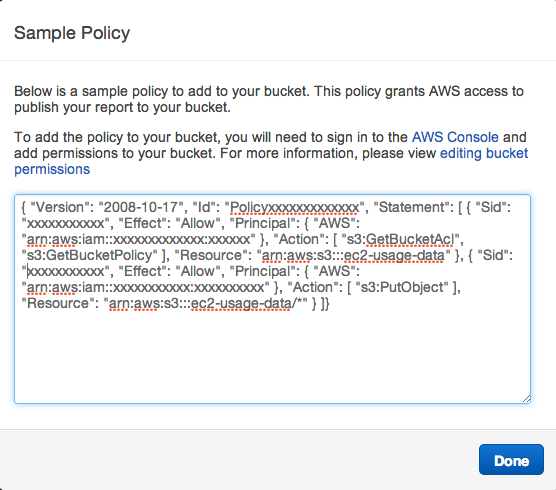
S3のパーミッションのコンフィグが出てくるので、コピー。

s3_config

4、再度S3へ移動して、最初に作成したバケットを選択して、
Properties=>Permissions=>Add bucket policy
で、先ほどコピーしたコンフィグを適用する。

5、またまたBilling console=>Preferencesへ移動して、
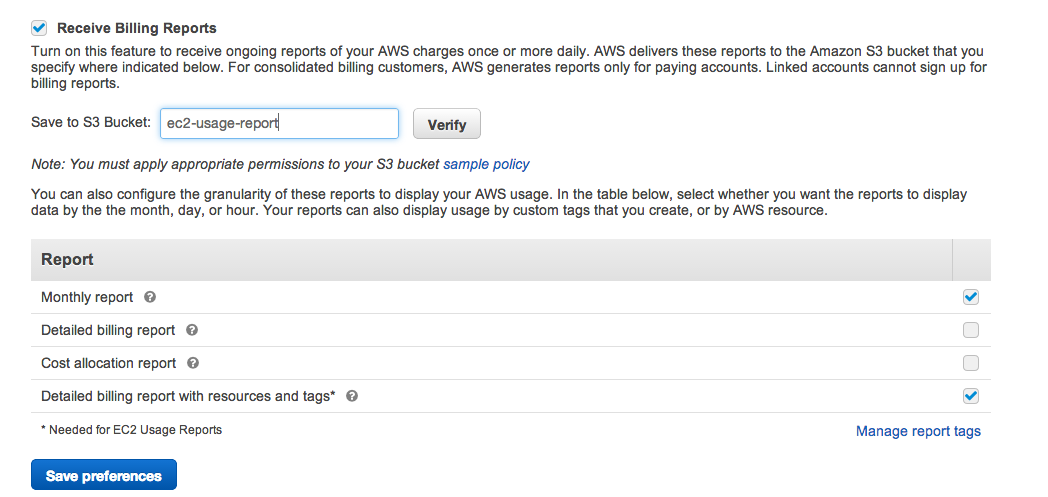
Receive Billing Reportsにチェックをつけて、
フォームに上で作成したS3バケット名を入力します。
Valid Bucket Nameが表示されればOKです。
画面下部「Report」の
Detailed billing report with resources and tagsにもチェックを入れて、
Save Preferencesをクリックします。

ec2_report

これで、設定が完了です!
先にS3のパーミッションを設定しておかないと、
Verifyが通らないんですが、(後から考えれば当たり前。)
ページの上から設定していくとちょっとあれっとなるので、
ご注意を!

レポートが生成されるまで、数時間から1日程度かかるようです。

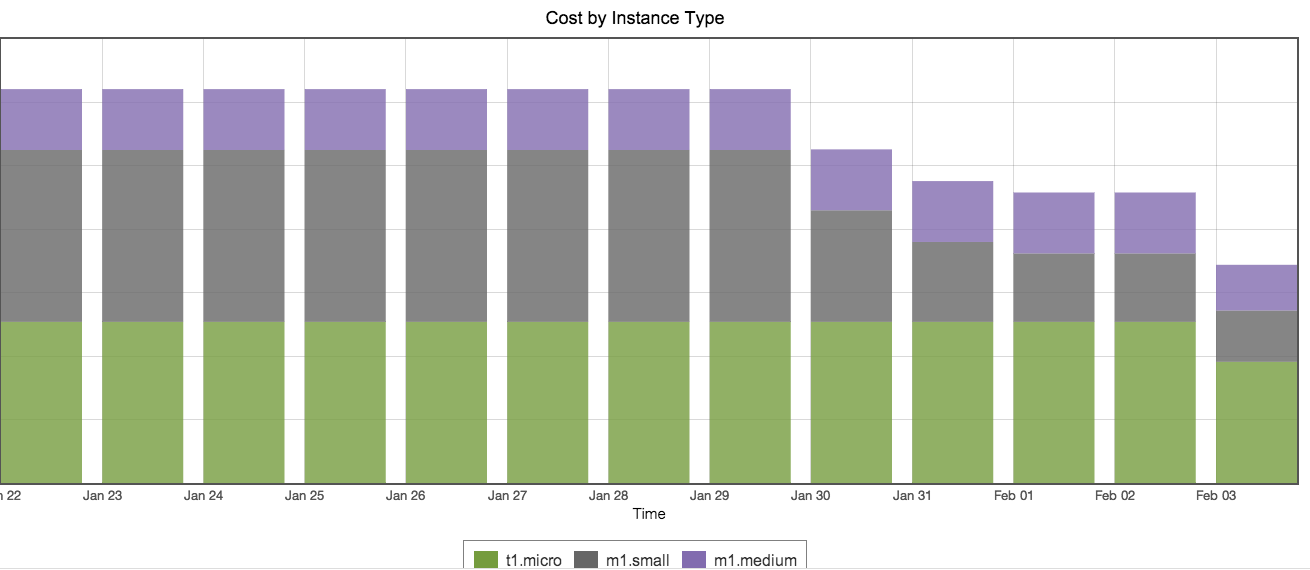
レポートが生成されるとBilling console=>reportsから、
「EC2 Instance Usage Report」と「EC2 Reserved Instance Utilization Report」が
閲覧できるようになります。

ec2_usage_report

AWS/ec2にEIPを複数付ける時のtips

1インスタンスに複数のENI/EIPを設定するとときに、
eth0のエイリアスを複数用意する必要があります。

その際以下の方法で複数のifcfg-eth0:*を作らず1つのファイルだけで
privateIPを一括設定することが可能です。
例)PrivateIP(10.0.0.0/24)
10.0.0.10 (ENIのメインIP)
10.0.0.11〜10.0.0.19(エイリアスIP)

cd /etc/sysconfig/network-scripts/

vi ifcfg-eth0
———————
DEVICE=eth0
BOOTPROTO=dhcp
ONBOOT=on
———————

vi ifcfg-eth0-range:1
———————
IPADDR_START=10.0.0.11
IPADDR_END=10.0.0.19
NETMASK=255.255.255.0
NAME=”range1″
CLONENUM_START=1
———————

service network restart

eth0   =>10.0.0.10
eth0:1=>10.0.0.11
eth0:2=>10.0.0.12

eth0:9=>10.0.0.19

の設定が行われます。

ポイントは、
メインIPはDHCP指定にすること

エイリアスの設定にNETMASKの指定
を忘れない事です!
(メインIPってDHCPでなくstaticで指定してもいいのかな??)

ストリーミングサーバ C++ RTMP Serverのインストール

Linuxで動くRTMP対応のストリーミングサーバと言えば、

FMS(Flash Media Server)やRed5が有名ですが、

今回はC++ RTMP Serverのインストールです。

環境
CentOS6
apacheインストール済み

cd /usr/local/src/
wget http://rtmpd.com/assets/binaries/784/crtmpserver-1.1_beta-x86_64-CentOS_6.2.tar.gz

mkdir /usr/local/lib64/crtmpserver-1.1

tar xfz crtmpserver-1.1_beta-x86_64-CentOS_6.2.tar.gz -C /usr/local/lib64/crtmpserver-1.1

mv /usr/local/lib64/crtmpserver-1.1/crtmpserver-1.1_beta-x86_64-CentOS_6.2/* /usr/local/lib64/crtmpserver-1.1/.

rm -rf crtmpserver-1.1_beta-x86_64-CentOS_6.2

cp configs/flvplayback.lua configs/flvplayback.lua.org

vi configs/flvplayback.lua
—————
–mediaFolder=”./media”,
mediaFolder=”/var/www/html/rtmp”,
—————
=>RTMPのルートディレクトリを変更します。
configはlua言語で書かれているので、注意。

./run_flvplayback_daemon.sh
=>デーモン化させます。

これでRTMPサーバの設定は完了。
結構簡単!

あとは、動画プレイヤーを設定すればストリーミングが可能です。

今回は、Flowplayerを使ってみたので、以下参考までにhtmlファイルを。

—————————-

<!doctype html>


MP4 RTMP-streaming : Flowplayer


”title


—————————-

apacheのドキュメントルートの/vaw/www/html/以下に

sample.html
start.jpg (再生前の画像)
rtmp/sample.mp4 (動画ファイル)
rtmp/flowplayer.rtmp/flowplayer.rtmp-3.2.12.swf (プレイヤー)
rtmp/flowplayer/flowplayer-3.2.16.swf (プレイヤー)

を配置しています。

動画ファイルの置く場所を工夫すれば、
apacheから直接動画へアクセスされる事も防止出来ます。

とはいえ、今の時代スマホのブラウザだとRTMPは厳しいからね・・・

仮想端末管理のtmuxをCentOS6にインストール

screenの代わりにtmuxを使っているのを最近よく見るので、
とりあえずインストールしてみる。

◯環境
CentOS6

wget http://pkgs.repoforge.org/tmux/tmux-1.6-1.el6.rf.x86_64.rpm

yum -y install tmux-1.6-1.el6.rf.x86_64.rpm

使い始めはすんなり操作出来ずイライラしますが、頑張って慣れる。

ちなみにmacへのインストールは、

brew install tmux

で一発!

サーバ管理ツールZPanelcpのインストール

サーバ管理パネルで良さそうなものを見つけた。

http://www.zpanelcp.com/

日本語対応しているし、
(ispcpと違い)メンテもされているし、
(pleskと違い)設定ファイルも素直で分かりやすい。

早速インストールしてみた。

環境
CentOS6 minimulインストール
ZPanelcp 10.0.2
※10.1.0はFTPのユーザー設定でバグがあった。

wget http://www.zvps.co.uk/sites/default/files/downloads/centos-6-3/package/installer-x86_64-install.sh.x.tar.gz tar -xf installer-x86_64-install.sh.x.tar.gz
chmod +x installer-x86_64-install.sh.x

./installer-x86_64-install.sh.x
=>ここからは対話式で。

———–
To contine please agree to the GPL license (y/n/q)? y
Find your timezone from : http://php.net/manual/en/timezones.php e.g Europe/London
Enter Your Time Zone: Asia/Tokyo
Install fresh ZPanel server or enter an upgrade version number e.g 10-0-1 :install
Enter the FQDN of the server (example: zpanel.yourdomain.com): zpanel.hoge.jp
Enter the Public (external) IP of the server: xxx.xxx.xxx.xxx

Password you will use for MySQL: passwd
Re-enter the password you will use for MySQL: passwd

instal ? y
いろいろインストールされる

Daemon run complete!

########################################################

# Congratulations ZpanelX has now been installed on your #
# server. Review the log file left in /root/ for #
# any errors encountered during installation. #
# #
# Save the following information somewhere safe: #
# MySQL Root Password : passwd #
# ZPanelX Username : zadmin #
# ZPanelX Password :

New server crypto key written to cnf/security.php
New API key has been generated!
Account password for ‘zadmin’ has been updated!

K0psLxb7nPjDzE7f #
# #
# ZPanelX Web login can be accessed using your server IP #
# inside any http web browser. #
# #
# As soon as the server reboots (which is about to happen) #
# please login to zpanel and change the zadmin password #
# using the ‘Change Password’ module. #
# #
# REPORT ZPANEL INSTALLATION BUGS AND ZPANEL CORE BUGS TO: #
# (http://bugs.zpanelcp.com) #
# #
# This installer has been thoroughly tested on #
# (http://www.zvps.co.uk) zVPS servers. However it is not #
# possible to guarantee the compatibility of other VPS #
# provider Operating System templates of CentOS 6. #
# #

#

ここで一旦リブートされます。
パスワード等メモし忘れても、インストールディレクトリにログが残ってます。

ブート後、日本語対応させるためのモジュールをインストール。
zppy repo add zpanel-packages.sammottley.co.uk
zppy update
zppy install ZXTS

ブラウザから

http://ServerIP/

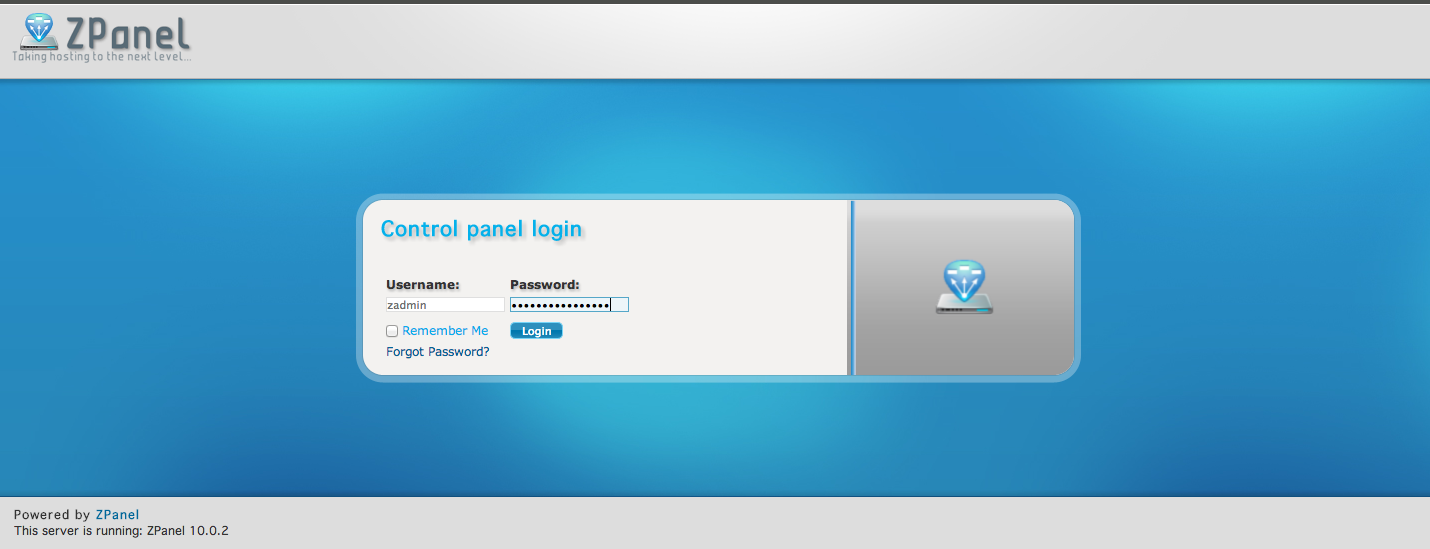
でログイン画面が表示されます。

スクリーンショット 2013-08-19 17.27.01

ログイン後、スクリーンショット 2013-08-19 17.27.46

ModuleAdminへ。

スクリーンショット 2013-08-19 15.52.47

ZXTSをadmin権限で有効にする。

スクリーンショット 2013-08-19 17.28.34

トップ画面にZXTSが表示されるので、移動してJapaneseをinstall or updateをクリック。

スクリーンショット 2013-08-19 15.53.40

その後でremove Symbolic Supportをクリック。

スクリーンショット 2013-08-19 17.29.04

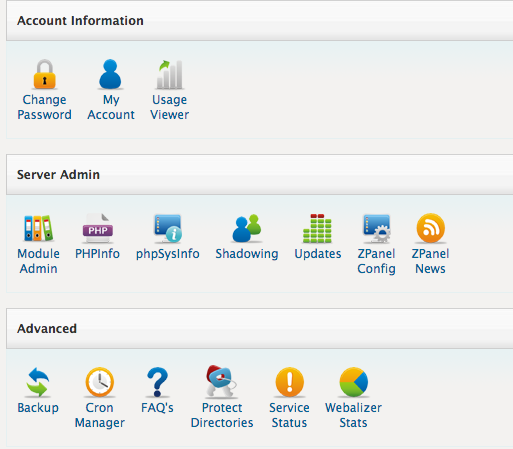
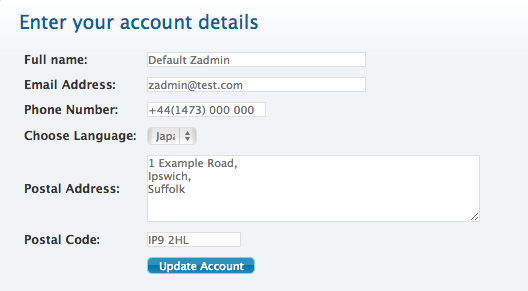
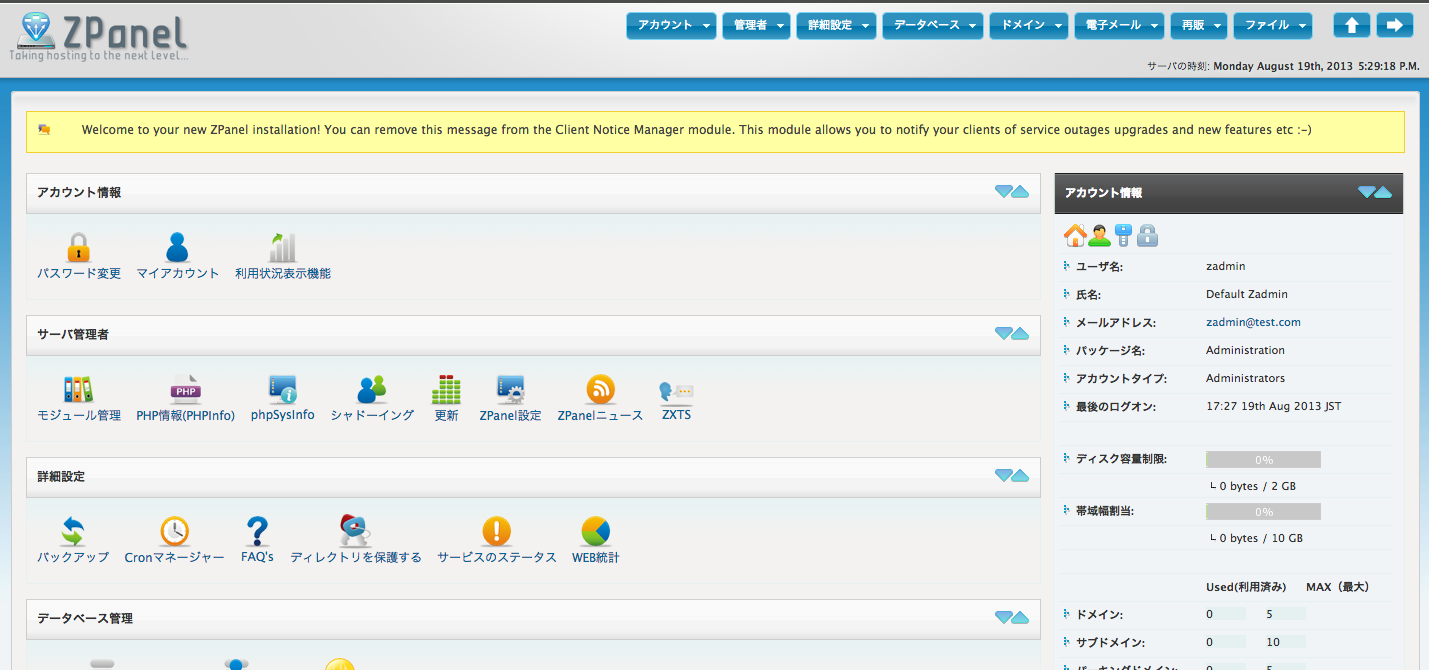
MyAccountに移動して、メールアドレスと言語を設定すると日本語表示になります。

スクリーンショット 2013-08-19 17.29.14

デフォルト設定だとメールの送信ができないので、
Zpanel設定からAUTHとSMTPを有効にする。
スクリーンショット 2013-08-19 17.29.31

個人的には10.1.0のデザインの方がカッコいいので、
早くバグフィックスされる事を願います。

CentOS6でphp4とphp5を共存させる

さすがにphp4系で新規構築はなくなりましたが、
リプレイスでどうしても入れてほしいっていうケースが多々あります。
せっかくなので、php5とphp4を共存させましょうというお話です。

環境:CentOS6
apache2.2(既にインストールされているものとします)
php5はデフォルトのパッケージ版(既にインストールされているものとします)
php4はソースからインストールします

まずは事前に必要そうなパッケージをインストールします。
(本当は事前になんて分からず何度もやり直しですが。。。)

yum -y install httpd-devel bzip2-devel openssl-devel libjpeg-devel libpng-devel gmp-devel ncurses-devel flex gcc make

cd /usr/local/src

php4系の最終リリース4.4.9をダウンロード
wget http://jp2.php.net/get/php-4.4.9.tar.gz/from/this/mirror

tar xvf php-4.4.9.tar.gz
cd php-4.4.9
ここでphp5と共存させるので
MIMEタイプがphp5とかぶらないように変更

vi sapi/apache2handler/sapi_apache2.c
————–

define PHP_MAGIC_TYPE “application/x-httpd-php”

define PHP_SOURCE_MAGIC_TYPE “application/x-httpd-php-source”

define PHP_SCRIPT “php-script”

↓に変更↓

define PHP_MAGIC_TYPE “application/x-httpd-php4″

define PHP_SOURCE_MAGIC_TYPE “application/x-httpd-php4-source”

define PHP_SCRIPT “php4-script”

————–

configureを走らせます
./configure –prefix=/usr/local/php4 –with-apxs2=/usr/sbin/apxs –with-sqlite –with-mysql –with-gd –with-jpeg-dir=/usr –with-png-dir=/usr –with-zlib –with-bz2 –with-openssl –with-gettext –with-gmp –with-iconv –with-ncurses –enable-exif –enable-gd-native-ttf –enable-memory-limit –enable-mbstring –enable-mbstr-enc-trans –enable-mbregex –enable-bcmath –enable-trans-sid –enable-sysvsem –enable-sysvshm

しかし途中で
configure: error: libjpeg.(a|so) not found.
のエラーが、、、

locate libjpeg.so
/usr/lib64/libjpeg.so
/usr/lib64/libjpeg.so.62
/usr/lib64/libjpeg.so.62.0.0

ちゃんとライブラリはあるのに、、、

http://d.hatena.ne.jp/lion_and_perican/20110207/p1

を参考に

–with-libdir=lib64

とかつけてもダメ。。。。
しょうがないので、シンボリックリンクで対応。

ln -s /usr/lib64/libjpeg.so /usr/lib/
ln -s /usr/lib64/libpng.so /usr/lib/

再度、configureを走らせます

./configure –prefix=/usr/local/php4 –with-apxs2=/usr/sbin/apxs –with-sqlite –with-mysql –with-gd –with-jpeg-dir=/usr –with-png-dir=/usr –with-zlib –with-bz2 –with-openssl –with-gettext –with-gmp –with-iconv –with-ncurses –enable-exif –enable-gd-native-ttf –enable-memory-limit –enable-mbstring –enable-mbstr-enc-trans –enable-mbregex –enable-bcmath –enable-trans-sid –enable-sysvsem –enable-sysvshm

今度は成功!

コンパイルへ。

make

make: *** [ext/openssl/openssl.lo] Error 1

エラー。。。

http://www.softel.co.jp/blogs/tech/archives/3777

によると

OpenSSLのライブラリのバージョンが合わないらしく(0.9.8系と1系)、configureできてもmakeのときにエラーとなったりします。

らしいです。

修正版を拝借。
wget http://www.softel.co.jp/blogs/tech/wordpress/wp-content/uploads/2012/10/openssl.c cp openssl.c ext/openssl/openssl.c

再度コンパイル!
ちょっと豪勢に高めのec2インスタンスを用意したので、
jオプション16!
30秒くらいで終わりました。
ちなみにmicroインスタンスだと10分くらいかかりました・・・

make -j16

無事終了したのでインストール。

make install
インストール時にhttpd.confにモジュールがロードされるのでコメントアウト。

vi /etc/httpd/conf/httpd.conf
——————

LoadModule php4_module /usr/lib64/httpd/modules/libphp4.so

——————

分かりやすいように、/etc/httpd/conf.d/に書き直します。
最初に直したMIMEタイプを指定。

vi /etc/httpd/conf.d/php4.conf
——————
LoadModule php4_module modules/libphp4.so
AddHandler php4-script .php
——————

/etc/init.d/httpd restart

これで、
拡張子をphpで指定するとphp5が動き、
php4と指定するとphp4が動きます。
もちろん、htaccessで切り替える事で、
拡張子がphpのファイルをphp4で動かす事も出来ます!

.htaccess
—————
AddHandler php4-script .php
—————

ちなみにAmazonLinuxだとどうしても
php4とphp5を共存させるとapache起動時に
segmentation faultが発生してしまったので諦めました…orz